
Thursday, January 4, 2018

Thursday, September 29, 2016
CottonCuts Member Spotlight

The creative minds over at Cotton Cuts asked me to be part of Member spotlight this week. Who doesn't love fabric?? But over at Cotton Cuts, they do something really special to me; they employ Handicapable workers. Now that's a win-win in my book.
Wednesday, February 24, 2016

Tuesday, September 1, 2015
Back To School Blog Hop: So, Does the Diagonal Method For A Pieced Backing Really Work?
In the years I have been quilting, I've heard about a method to extend the width off-the-bolt quilting cotton and always wondered about it. It was a little like the legend of the summer camp ghost - evanescent. Ethereal......
What was this all about? How was it done? Did it really work?
With a long arm machine in my studio, having "ready-to-load" backing is critical.
I've got too many tops that need to be quilted, and not enough time to fuss around with backings.
It should also be said that I *may* occasionally look for a shortcut to reduce my work load. Not that I'm lazy....but, I have my "priorities" straight. aka: lazy.
I've looked up the method a dozen times, but it included the dreaded: QUILT MATH. Not regular arithmetic...it looked like a quadratic equation.
Cue the high-school-math-related PTSD. [And I attended a nationally known Math & Science high school in the nations largest city, sorry Mr. Fisher - Hello!! #Stuy84]. But, I never got a chance to actually try it.
When I was invited to the Back To School Blog Hop, I suggested a post about "The Diagonal Piecing Method" for quilt backs. Note to self: stop volunteering!!
In it's most basic form, the "Diagonal" method involved cutting a length of fabric diagonally, sliding the halves and sewing it back together in a wider size. Kind of like a "Z-plasty" done by cosmetic surgeons.

Because most quilting fabric is 44" wide off the bolt, quilts wider than 40" or so will require either a special wide-with fabric, or....piecing. Especially if the quilt is being sent to a long arm quilter, who will ask for about 4" extra on each side to load the quilt properly. Some people "just do it, others create a reliable, tested solution. The original quilter to quantify this concept was John Flynn, and his post provides a detailed description, diagram and printable instructions here.
In my research, I came across two very different blog posts I found helpful. If you are thinking about trying the "Diagonal" method for the first time, I suggest you check them out.
My friend Ebony Love discusses her take on this method here. She adds what I think it an intuitive and quite obvious solution that avoids most math!!!! I think this is a great idea if you have some orphan blocks or extra top facbric you want to include in the back. And, did I say, virtually no math?
Kathy Mack of Pink Chalk Fabrics described her experience with the method here. She raised some very good issues with regard to fabric choice that would definitely save the beginner some time and anguish. She provides step by step photos, which were very helpful as I tried to work through this process for myself. Kathy discusses her results and process in a straight-forward and easy to follow manner.
I learn better by doing (kinesthetic) than reading (visual), so I decided to try this out on a very small scale. For illustration purposes, here's a fat quarter:

And here is a fat quarter on "the Diagonal":

As you can see, the fabric expanded by 10" in width, but shrunk by about 9" in length.
The purpose of Flynn's equation was to determined the length of fabric (LOF) needed to create a finished backing of the desired width. The best example is using a standard 44" wide quilting cotton, what length do you need to create a backing of "X" width. "Simply" plug in you dimensions to the formula, crunch the numbers and you can calculate how many yards are needed.
[easier said than done - it's been over 30 years since I finished Algebra!!!!]
For example, if I need a 60" wide back from my 44" wide fabric...and I only have 1.5 yards, do I have enough?
But I think the power of this equation is even larger than that. If you know any 3 of the 4 dimensions, you can solve for any variable. Thus, this formula can be used to figure out how wide you can make one yard of fabric.....or any of the variables.
Or, if you're brave, you can just slice, and slide.
So, final answer: Yes, it works.
Pros:
- use your stash
- less bulky when quilted
- inconspicuous if using a solid or blender fabric
-you can get creative with it
Cons:
- bias sewing
- could require math
- not appropriate for obvious prints or directional fabrics
-more challenging for larger quilts
-did I mention...bias sewing?
So, welcome "Back to School"!! I hope you'll think about stretching your wings and trying this method if you haven't before!
 |
| My worthless Studio Assistant, Betty |
Stay tuned: Back to School Blog Hop!!
Tick Tock, Tick Tock!

My Back To School post is coming soon!
Just as soon an I get that purple mimeograph ink off my hands!
Can you smell it?
Meanwhile, check on some of the other Bloggers who are getting ready to go
Back to School!
Monday, May 11, 2015
Spring Clean Your a Studio Blog Hop
Here in Chicago, it seems like spring might have forgotten us, but today was - at least for a few minutes - glorious. For the first time in about eight months. I spent the day in my sewing studio.

When I heard that Cheryl Sleboda over at muppin.com was hosting a spring cleaning blog hop, I knew I had to sign on. My sewing area had turned into a full on hotmess. Several upgrades, and a desire to expand my longarm to its full 12 feet created some urgency to get things under control. This blog hop was just thehigh-pressure deadline motivation I needed.
This project began as a serious uphill battle:

Yes: somewhere under there IS my long arm. Crying.

And a brand spanking new Janome MCP 12000.
My view from my sewing machine: CHAOS.


May 7 Kathy Matthews http://www.chicagonow.com/quilting-sewing-creating/
May 8 Misty Cole Http://www.dailydesignwall.blogspot.com
May 9 Heather Kinion http://heatherkinion.com/
May 10 Jessica Darling http://jessicakdarling.com/
May 11 Lisa Blevis Filion http://upstatelisa.blogspot.com/
May 12 Peta Minerof-Bartos http://www.thenotsewguiltyquilter.blogspot.com/
May 13 Mandy Leins http://mandalei.com/
May 14 Amalia Teresa Parra Morusiewicz http://funfromatoz.com/
May 15 Sam Hunter http://huntersdesignstudio.com/
May 16 Debby Ritenbaugh Brown http://higheredhands.blogspot.com/
May 17 Debbie Kleve Berkebile http://www.mountaintrailquilttreasure.blogspot.com/
May 18 Michelle Mattingly http://stitchesofjoi.blogspot.com/
May 19 Cheryl Sleboda http://blog.muppin.com

When I heard that Cheryl Sleboda over at muppin.com was hosting a spring cleaning blog hop, I knew I had to sign on. My sewing area had turned into a full on hotmess. Several upgrades, and a desire to expand my longarm to its full 12 feet created some urgency to get things under control. This blog hop was just the
This project began as a serious uphill battle:
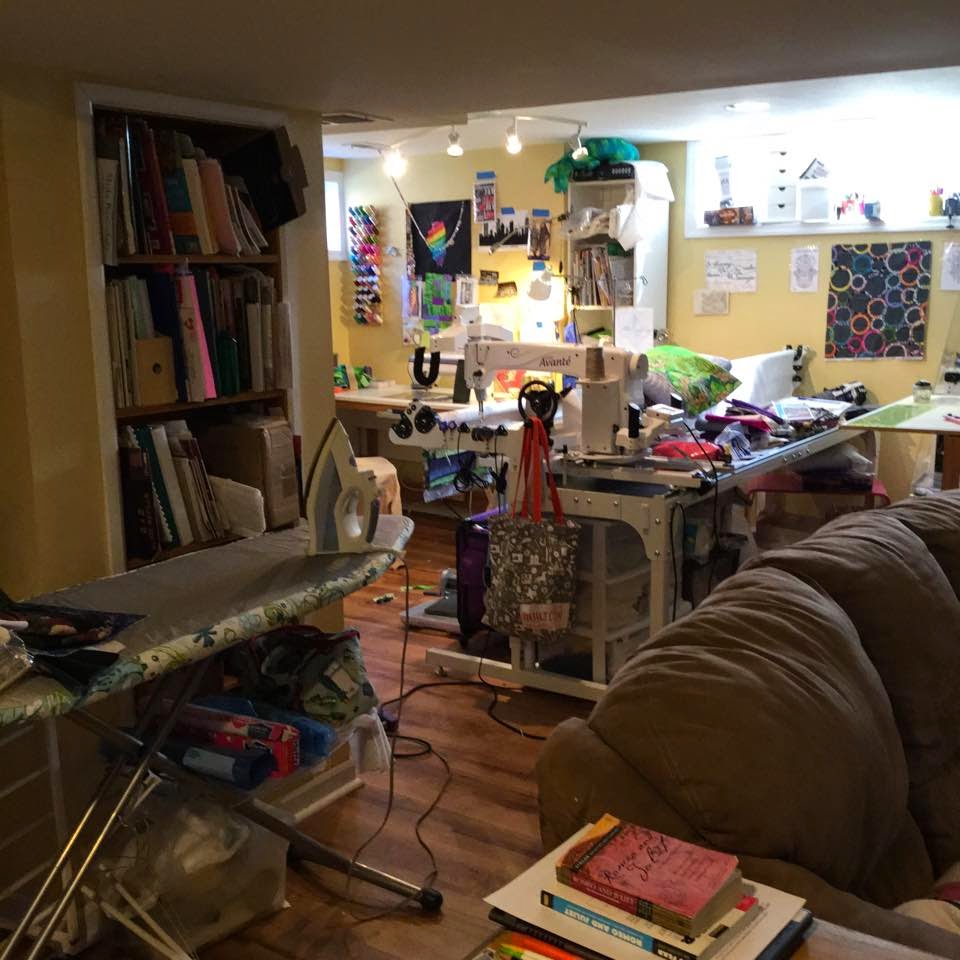
Yes: somewhere under there IS my long arm. Crying.

And a brand spanking new Janome MCP 12000.
My view from my sewing machine: CHAOS.
impossible to find a thing

Seriously stressful to be here

So, obviously, it was time for something drastic: like expanding the long arm.
 |
| Easy, peasy...right?? |
So a team of experts was brought in. Everyone pitched in, even Genevieve the pug.
And the Fairy Godmother of Quilting waved her magic wand (I mean days of backbreaking work, purging and reorganizing)....and....behold:
 |
| "Jerome" loves her new clean table by Tracy's Tables |
 |
| Casters allow the long arm to be shifted depending on whether I need to work from the back or front |
 |
| Cutting table by Tracy's Table is lowered for more room. |
 |
| Whoa - there's room for a HUGE quilt |
 |
| One leaf of my Tracy's table lifted for a small cutting area. |


The devil is in the details: IKEA Stugvik bathroom accessories keep small tools handy (L), all my Aurilfil pretties nearby (C) and fabrics reorganized by color for easier design & access. And I should probably mention that the long arm is the Avante by HandiQuilter on a Studio Frame. (I love my HandiQuilter!!) There *might* be some areas of the basement that still need some work, but this has been a huge improvement for me.
It's a big struggle for me, but I was able to purge quite a bit to free up space. I sold an old back up machine, and have my Pfaff 7570PCD listed for sale as well. I'll be able to get a light machine for travel and retreats.
But the most wonderful thing in my new studio, I did not even plan. It was a surprise Mother's Day gift from #2. She DIY-ed it on her own, enlisting Honey's assistance and a few "trips to the Library" to get her supplies. I love seeing it over my sewing station.
Grumbly outtakes:
 |
| Oh, I'm not supposed to be crawling around with a broken foot? |


This makeover was exhausting, yet badly needed. I'm really proud of adding the extension ourselves! I can't even believe this is MY studio as I look at these pictures. There is some (possibly alot) more work to do, but I can't wait to sew again!!
Please stop by and see all these wonderful quilters who are participating in the #Springcleanyourstudio Blog Hop. They have opened their studios to give you a before and after look at their sewing spaces.
May 8 Misty Cole Http://www.dailydesignwall.blogspot.com
May 9 Heather Kinion http://heatherkinion.com/
May 10 Jessica Darling http://jessicakdarling.com/
May 11 Lisa Blevis Filion http://upstatelisa.blogspot.com/
May 12 Peta Minerof-Bartos http://www.thenotsewguiltyquilter.blogspot.com/
May 13 Mandy Leins http://mandalei.com/
May 14 Amalia Teresa Parra Morusiewicz http://funfromatoz.com/
May 15 Sam Hunter http://huntersdesignstudio.com/
May 16 Debby Ritenbaugh Brown http://higheredhands.blogspot.com/
May 17 Debbie Kleve Berkebile http://www.mountaintrailquilttreasure.blogspot.com/
May 18 Michelle Mattingly http://stitchesofjoi.blogspot.com/
May 19 Cheryl Sleboda http://blog.muppin.com
Wednesday, April 29, 2015


Sunday, March 29, 2015
Bob-A-Long with me!
I'm so excited to be participating in QuiltJane's Bob-A-Long with GnomeAngel, and be a part of the blog hop celebrating this adorable new pattern: The Bob Bag
.

 |
| my version of the Bob Bag |
This darling little mini tote, at 4"x 4" x 2 1/2" is designed to keep threads handy for hand sewing on-the-go. You've got to agree, it's a stylish way to keep supplies handy for doing small hand stitching projects on the road. As you can see, I had some fun with the quilting here.

Best of all, it can [really!!] be completed in less than two hours, using (hardware) store bought bolts for under $1. Not to mention the amusing looks of the face of the hardware dude when he hears what you're looking for and why.
The Bob Box is going to make a great swap item or gift for a quilty buddy! To purchase the pattern, click here The Bob Box by QuiltJane
The kit is made of two parts, an inner tray that holds the bobbins and an outer zipper tote. As you might notice, I made good use of my WonderTape.

Seriously, how fun is a sewing project that requires tools and hardware? This was a great use of my punches!
Once the tray is complete, it's time to assemble the outer zipper tote. Because the project is so tiny, it was a great way to use some of the smaller fabric scraps I've been hanging on to.


"Mom, I don't think that will fit my water polo stuff" No, actually, it won't.
Hop on over to GnomeAngel's blog to see some of the other Bob Boxes in the quilt-along!
Monday, February 9, 2015
Happy 2015: The Year of the Destash!
it's the year of DESTASH !!


I surrender: my stash is out of control. If I live to be 100, I still couldn't use it all.
So this year, I pledge to focus on my stash, and use it up!
Honestly, hanging on to old stuff doesn't leave any room for new ideas.
For the first week of the year, I was very successful. I finally took apart an old, scorched ironing board cover and re-purposed it. I bought a replacement months ago, but it did not fit the XL board, and I'd been ironing on a jacked up, slipping off cover for months!

Ewwwww. Seriously?
It took a while, but the gears finally worked, and I figured out a solution. Using some bright, floral fabric, I created an extension to the new [too small] cover allowing to fit the bigger board. I made sure the hem was generous enough to work as a casing for the old drawstring. Ahh, I can't express how much nicer it feels to iron on a clean, tidy ironing board.
I'm a bit of a hoarder, and it just about killed me to throw away the old cover...... so this happened:
 |
| Finally!! Used that iron caddy/pad pattern!! How cute is this? |

And this!! I've burned all my potholders, so I plucked some of my fat quarters and made this sweet, oversized potholder. Cooking in style.
Best of all: this was ALL from stash!!
Monday, December 8, 2014
It's Giveaway Day!
Over at SewMamaSew, they're hosting "Giveaway Day", so I thought's I jump in.
Because I don't already have enough to do, right?

So, here are the rules:
Leave a comment her for one entry.
Leave a comment on my Instagram @petaquilts for another entry. See that little icon up top? well, click it!
Overachiever? tag 3 friends on IG for another entry.
Heck, are you REALLY an over achiever? leave a comment on my Pinterest!
OK....GO!
Because I don't already have enough to do, right?
Enter to win free motion quilting on a mini project of
36" x 36" or less~
Winner must submit quilt top, batting and backing by 12/31.
[Postage paid by winner]
So, here are the rules:
Leave a comment her for one entry.
Leave a comment on my Instagram @petaquilts for another entry. See that little icon up top? well, click it!
Overachiever? tag 3 friends on IG for another entry.
Heck, are you REALLY an over achiever? leave a comment on my Pinterest!
OK....GO!
Saturday, November 15, 2014
Handmade Hanukkah: Table Runner Edition
In continuing the holiday theme, I present......


Hanukkah Table Runner
As part of the SewMamaSew.com "Handmade Holidays" series, I searched for fun, fresh handmade projects to celebrate the Jewish holiday of Hanukkah. It was a bit of a challenge.
I did find this blog post, with wonderful handmade Hanukkah cards. I love the idea and the design so much, that I needed to make it into some kind of hand-sewn project for the upcoming Jewish holidays.
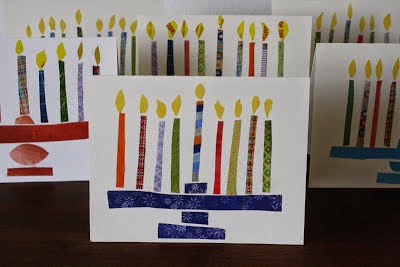 |
| photo courtesy of BagelsandCrawfish.blogspot.com |
The kind folks over at BagelsandCrawfish gracious provided permission for me to use their cards as inspiration for my projects. Hop over here to read more about how they made these delightful cards.
What you'll need:
- 1 fat quarter for background
- assorted scraps for candles
- 5" square of orange for flames
- large scrap for menorah
- iron on fusible such as Steam-A-Seam Lite or similar
- 1 yard or 2 fat quarters for table runner
- backing 20" x 63"
- matching thread
To begin the project, I selected a white background from my fat quarter stash collection, and spend a few minutes poking through my scrap bin to find some bright, colorful pieces for the candles. It really evoked my memories of the brightly colored candles we used when I was young, and still use today.
The candle scraps were about 1-2: wide and about 6" long. For the menorah base, I sue a fat quarters I'd been saving for something special - this project definitely qualified.
Prepare your background by marking the center.
For the menorah base, cut a piece of fusible about 4-6" wide x 12" long
Fuse to the WRONG side of the fabric,
From the fused fabric, cut the pieces for your menorah base as desired.
Arrange your pieces, centered on the bottom 1/3 of your background.
Once you are satisfied with the placement, remove the paper backing and fuse the pieces to the background following the manufacturer's directions.
For the candles, iron fusible to the scraps you selected and cut them to about 1" x 6"
Cut one slightly large candle for the center "shamash" candle.
Finally, cut 9 teardrop shapes for the flames - this is much easier when the fabric is pre-fused (ask me how I know)
I wanted to really highlight the "handmade" look seen in the cards, so I paid special attention to making the candles not appear perfectly straight.
Once all of the candles and flames are firmly fused, you can do a number of creative things with your fabric menorah. I decided on a table runner.
Trim the menorah block square; mine turned out to be 20: x 20"
To complete the table runner, I then added a 20"x 20" section of novelty fabric on each side. Two fat quarters could be substituted also
I backed it with leftover holiday fabric sections measuring 20" x 63", leaving a 6"-8" section open for turning.
Finish off by whip stitching the opening.
I will be quilting the table runner, so I left one short side open to allow for batting.
For more information about the Jewish Holiday of lights, and the traditional prayers said over the candles each night, click here.
Happy Hanukkah!
Friday, November 14, 2014
Oooh, Look! Sparkly!
It's that time of year again.
We're getting a little tired of Pumpkin Spiced anything, and the poor Thanksgiving turkey is sobbing in the corner because he got squeezed out between Halloween and the looming Christmas festivities.
And those of us who celebrate Hanukkah, the Jewish Festival of Lights, often wonder where "our" holiday decoration are.
So this year, I'm doing something different!


We're getting a little tired of Pumpkin Spiced anything, and the poor Thanksgiving turkey is sobbing in the corner because he got squeezed out between Halloween and the looming Christmas festivities.
And those of us who celebrate Hanukkah, the Jewish Festival of Lights, often wonder where "our" holiday decoration are.
So this year, I'm doing something different!

In searching for inspiration, I came across a lovely paper piecing pattern by Marsha Hohn at Quilter'sCache for this "menorah" block*. At first, I noticed how many little pieces there were! But following the numbers in this pattern, it went quickly, and easily.....
and turned out looking wonderful!
After completing the block, I did some stitch in the ditch around the menorah and candle. To add some texture, I did some free-motion quilting to the background in a matching tread,
I decided it stood very well on its own, so I simply added a facing, instead of the more traditional binding.

It turned out great, and will make a darling mini wall hanging to add some special sparkle to our house this Hanukkah!
*Permission generously provided by Marsha Hohn of QuiltersCache.com
Subscribe to:
Posts (Atom)