Monday, December 8, 2014

It's Giveaway Day!

Over at SewMamaSew, they're hosting "Giveaway Day", so I thought's I jump in.
Because I don't already have enough to do, right?


Enter to win free motion quilting on a mini project of 
36" x 36" or less~
Winner must submit quilt top, batting and backing  by 12/31.
[Postage paid by winner]


So, here are the rules:
Leave a comment her for one entry.
Leave a comment on my Instagram @petaquilts for another entry.   See that little icon up top? well, click it!
Overachiever?  tag 3 friends on IG for another entry.
Heck, are you REALLY an over achiever?  leave a comment on my Pinterest!

OK....GO!

Saturday, November 15, 2014

Handmade Hanukkah: Table Runner Edition

In continuing the holiday theme, I present......

Hanukkah Table Runner

As part of the SewMamaSew.com "Handmade Holidays" series, I searched for fun, fresh handmade projects to celebrate the Jewish holiday of Hanukkah.   It was a bit of a challenge. 

I did find this blog post, with  wonderful handmade Hanukkah cards.   I love the idea and the design so much, that I needed to make it into some kind of hand-sewn project for the upcoming Jewish holidays.
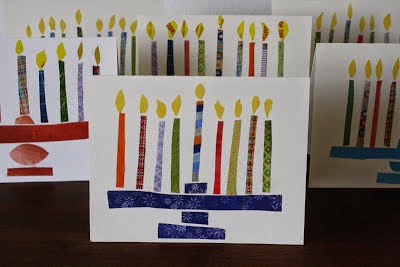
photo courtesy of BagelsandCrawfish.blogspot.com

The kind folks over at BagelsandCrawfish gracious provided permission for me to use their cards as inspiration for my projects.  Hop over here to read more about how they made these delightful cards.


What you'll need:
  • 1 fat quarter for background
  • assorted scraps for candles
  • 5" square of orange for flames
  • large scrap for menorah
  • iron on fusible such as Steam-A-Seam Lite or similar
  • 1 yard or 2 fat quarters for table runner
  • backing 20" x 63"
  • matching thread


To begin the project, I selected a white background from my fat quarter stash collection, and spend a few minutes poking through my scrap bin to find some bright, colorful pieces for the candles.  It really evoked my memories of the brightly colored candles we used when I was young, and still use today.   
The candle scraps  were about 1-2: wide and about 6" long.    For the menorah base, I sue a fat quarters I'd been saving for something special - this project definitely qualified.

Prepare your background by marking the center.

For the menorah base, cut a piece of fusible about 4-6" wide x 12"  long
Fuse to the WRONG side of the fabric,
From the fused fabric, cut the pieces for your menorah base as desired.
Arrange your pieces, centered on the bottom 1/3 of your background.


Once you are satisfied with the placement, remove the paper backing and fuse the pieces to the background following the manufacturer's directions.

For the candles, iron fusible to the scraps you selected and cut them to about 1" x 6"
Cut one slightly large candle for the center "shamash" candle.
Finally, cut 9 teardrop shapes for the flames - this is much easier when the fabric is pre-fused (ask me how I know)

I wanted to really highlight the "handmade" look seen in the cards, so I paid special attention to making the candles not appear perfectly straight.

Once all of the candles and flames are firmly fused, you can do a number of creative things with your fabric menorah.  I decided on a table runner.

Trim the menorah block square; mine turned out to be 20: x 20"


To complete the table runner,  I then added a 20"x 20" section of novelty fabric on each side.   Two fat quarters could be substituted also
I backed it with leftover holiday fabric sections measuring 20" x 63", leaving a 6"-8" section open for turning.
Finish off by whip stitching the opening.

I will be quilting the table runner, so I left one short side open to allow for batting.

For more information about the Jewish Holiday of lights, and the traditional prayers said over the candles each night, click here.

Happy Hanukkah!


Friday, November 14, 2014

Oooh, Look! Sparkly!

It's that time of year again.

We're getting a little tired of Pumpkin Spiced anything,  and the poor Thanksgiving turkey is sobbing in the corner because he got squeezed out between Halloween and the looming Christmas festivities.

And those of us who celebrate Hanukkah, the Jewish Festival of Lights,  often wonder where "our" holiday decoration are.

So this year, I'm doing something different!


In searching for inspiration, I came across a lovely paper piecing pattern by Marsha Hohn at Quilter'sCache for this "menorah" block*. At first, I noticed how many little pieces there were!   But following the numbers in this pattern, it went quickly, and easily.....
and turned out looking wonderful!

After completing the block,  I did some stitch in the ditch around the menorah and candle.   To add some texture, I did some free-motion quilting to the background in a matching tread,
I decided it stood very well on its own, so I simply added a facing, instead of the more traditional binding.
It turned out  great, and will make a darling mini wall hanging to add some special sparkle to our house this Hanukkah!


*Permission generously provided by Marsha Hohn of  QuiltersCache.com


Tuesday, October 28, 2014

Wordless Wednesday: Bloggers Quilt Festival Edition


Vote for your favorite quilt here

Blogger's Quilt Festival ~ Fall 2014

I've quietly watched the Blogger's Quilt Festival for years while quietly sewing at home.   It's finally time to enter....


Yes.  I I've gathered up the confidence, so here goes.

In the Modern category, I'm entering this lovely wall quilt I completed after taking a class called "Make Mine Modern" with the lovely and talented Dawn Cavanaugh at MQX in Springfield just a few weeks ago.   

You see, for years, I thought I wasn't "following the rules" and was embarrassed that I never seemed to like to follow the directions. Once I found the Modern Quilt movement, and my guild, The Chicago Modern Quilt Guild (my tribe!!), I realized there were a lot of people who didn't always like to follow the rules.
Taking this class really allowed to me LET IT GO!  and do the kind of quilting I've always wanted to be, was kind of afraid to. 

getting ready to QUILT!

So when Dawn said "Make it Modern", well..... I DID!     And, I love how it turned out!

so here's a sneak peek of my favorite detail:
petaquilts: 2014

Since I really wanted to spend my time playing with the quilting, I didn't stray too far from the sample design provided for class. Thought I did take several groups of fabric, and stressed a little about which combo was best.    I love the way these colors work together.

This class also allowed to pull all the tricks and tools together to create the quilting I wanted.  Using both the blue (water) erasable pens, and the purple (air) erasable pens, I subdivided the negative space to provide many different sections to try out various free-motion designs.    SOme desings came from our class discussions, others from my own bag of tricks, and still others from the lectures I;d attended the previous day with Angela Walters.    Can you say FUN?!?

And so,,,,,here it is!   

Make it Modern ~ Peta's Way ~ 2014


Thanks for reading
 I hope you enjoyed hearing about my quilt!

To see more quilts in the Blogger's Quilt Festival click here


Friday, June 6, 2014

Selvage Saturday

So excited to make up a couple of samples for a quilt buddy's booth at an upcoming quilt show. As I helped organize her fabric bundles, and other drool worthy ware for her set-up, I came across this book:
Save the Selvages!


I've been fascinated by selvage projects and hoarding collecting the colorful edges till I found a worthy project.    I flipped through this book and it was hard to choose just one!   For time sake, I selected two easy projects I knew I could quickly finish up for her.


When working with selvages in the past, my created fabric turned out curvy and and impossible to get flat.   One great tip in the book worked wonders for getting my work to lay perfectly flat: foundation piecing.


Once I got to working, it was so much fun, churning out these darling projects became almost infectious!    It was hard to stop.   I can't explain this fascination - it might be the explosion of colors -  but who am I to argue.   Once I completed the samples, I knew I would have a hard time parting with them, so I just keep on going, and going, and going.


I've collected quite a selvage stash.  As I was sewing, a little bulb went off in my head.    Die cut shapes are another fascination of mine, and I wondered what would happen if I combined the two.    So here are few giant selvage hexies!

I have a few ideas of how to build a quilt around them, though it will need some tinkering.   Stay tuned to see what these lovelies turn into.


So if you see these little gems at a quilt show soon, give them a little wave,  OK?

Thursday, June 5, 2014

GIfts: Memory Quilts Revealed - Part 2

Saying goodbye to Harley
A few months ago, another pug in our circle  left us suddenly. Harley was another distinguish gentlepug who found his family through rescue.  Along with his fur sisters, Sophie & Dixie,  he made a cross country move and welcomed a furless pup named Effie in the last year.

Harley struggled with several chronic health issues, but his decline was very sudden. We we all shocked by news that he had passed away.

Our group felt his family would be too saddened by a large quilt.  The decision was made instead to present them with a pillow in his honor.  Taking my design cue from his mother's wedding scheme, I created a custom pillow with a favorite photo on the front, and a custom label with all the donors on the back. This allowed a large donation to be made in his honor to his pug rescue group, Kentuckiana Pug Rescue.

And here's how it turned out:


I had the opportunity to hand deliver this gift.   While I wasn't able to smuggle Miss Effie home in my purse as hoped, I enjoyed meeting her in person!


Effie:   Wanna play Sophie?
Sophie: NO!

Photo label including all donors