Sunday, March 29, 2015

Bob-A-Long with me!

I'm so  excited to be participating in QuiltJane's  Bob-A-Long with GnomeAngel, and be a part of the blog hop celebrating this adorable new pattern:  The Bob Bag
.


my version of the Bob Bag

This darling little mini tote, at 4"x 4" x 2 1/2"  is designed to keep threads handy for hand sewing on-the-go.   You've got to agree, it's a stylish way to keep supplies handy for doing small hand stitching projects on the road.   As you can see, I had some fun with the quilting here.

One modification I made was adding a felt needle holder in the top of the case (deep pink).   Seriously - how cute is that?

Best of all,  it can [really!!] be completed in less than two hours, using (hardware) store bought bolts for under $1.    Not to mention the amusing looks of the face of the hardware dude when he hears what you're looking for and why.

The Bob Box is going to make a great swap item or gift for a quilty buddy!    To purchase the pattern, click here The Bob Box by QuiltJane
                                      

The kit is made of two parts, an inner tray that holds the bobbins and an outer zipper tote.  As you might notice, I made good use of my WonderTape.


Seriously, how fun is a sewing project that requires tools and hardware?    This was a great use of my punches!   


Once the tray is complete, it's time to assemble the outer zipper tote.  Because the project is so tiny, it was a great way to use some of the smaller fabric scraps I've been hanging on to.   


"Mom, I don't think that will fit my water polo stuff"    No,  actually, it won't.   

Hop on over to GnomeAngel's blog to see some of the other Bob Boxes in the quilt-along!


Monday, February 9, 2015

Happy 2015: The Year of the Destash!

it's the year of DESTASH !!

I surrender: my stash is out of control. If I live to be 100, I still couldn't use it all.
So this year, I pledge to focus on my stash, and use it up!

Honestly, hanging on to old stuff doesn't leave any room for new ideas.   

For the first week of the year, I was very successful.    I finally took apart an old, scorched ironing board cover and re-purposed it.   I bought a replacement months ago, but it did not fit the XL board, and I'd been ironing on a jacked up, slipping off cover for months!  

Ewwwww.  Seriously?
It took a while, but the gears finally worked, and I figured out a solution.   Using some bright, floral fabric, I created an extension to the new [too small] cover allowing to fit the bigger board.  I made sure the hem was generous enough to work as a casing for the old drawstring.     Ahh, I can't express how much nicer it feels to iron on a clean, tidy ironing board.


I'm a bit of a hoarder, and it just about killed me to throw away the old cover...... so this happened:

Finally!!  Used that iron caddy/pad pattern!! How cute is this?


And this!!   I've burned all my potholders, so I plucked some of my fat quarters and made this sweet, oversized potholder.   Cooking in style.

Best of all: this was ALL from stash!!


Monday, December 8, 2014

It's Giveaway Day!

Over at SewMamaSew, they're hosting "Giveaway Day", so I thought's I jump in.
Because I don't already have enough to do, right?


Enter to win free motion quilting on a mini project of 
36" x 36" or less~
Winner must submit quilt top, batting and backing  by 12/31.
[Postage paid by winner]


So, here are the rules:
Leave a comment her for one entry.
Leave a comment on my Instagram @petaquilts for another entry.   See that little icon up top? well, click it!
Overachiever?  tag 3 friends on IG for another entry.
Heck, are you REALLY an over achiever?  leave a comment on my Pinterest!

OK....GO!

Saturday, November 15, 2014

Handmade Hanukkah: Table Runner Edition

In continuing the holiday theme, I present......

Hanukkah Table Runner

As part of the SewMamaSew.com "Handmade Holidays" series, I searched for fun, fresh handmade projects to celebrate the Jewish holiday of Hanukkah.   It was a bit of a challenge. 

I did find this blog post, with  wonderful handmade Hanukkah cards.   I love the idea and the design so much, that I needed to make it into some kind of hand-sewn project for the upcoming Jewish holidays.
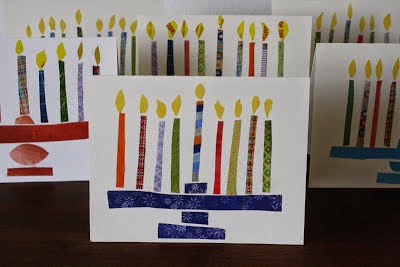
photo courtesy of BagelsandCrawfish.blogspot.com

The kind folks over at BagelsandCrawfish gracious provided permission for me to use their cards as inspiration for my projects.  Hop over here to read more about how they made these delightful cards.


What you'll need:
  • 1 fat quarter for background
  • assorted scraps for candles
  • 5" square of orange for flames
  • large scrap for menorah
  • iron on fusible such as Steam-A-Seam Lite or similar
  • 1 yard or 2 fat quarters for table runner
  • backing 20" x 63"
  • matching thread


To begin the project, I selected a white background from my fat quarter stash collection, and spend a few minutes poking through my scrap bin to find some bright, colorful pieces for the candles.  It really evoked my memories of the brightly colored candles we used when I was young, and still use today.   
The candle scraps  were about 1-2: wide and about 6" long.    For the menorah base, I sue a fat quarters I'd been saving for something special - this project definitely qualified.

Prepare your background by marking the center.

For the menorah base, cut a piece of fusible about 4-6" wide x 12"  long
Fuse to the WRONG side of the fabric,
From the fused fabric, cut the pieces for your menorah base as desired.
Arrange your pieces, centered on the bottom 1/3 of your background.


Once you are satisfied with the placement, remove the paper backing and fuse the pieces to the background following the manufacturer's directions.

For the candles, iron fusible to the scraps you selected and cut them to about 1" x 6"
Cut one slightly large candle for the center "shamash" candle.
Finally, cut 9 teardrop shapes for the flames - this is much easier when the fabric is pre-fused (ask me how I know)

I wanted to really highlight the "handmade" look seen in the cards, so I paid special attention to making the candles not appear perfectly straight.

Once all of the candles and flames are firmly fused, you can do a number of creative things with your fabric menorah.  I decided on a table runner.

Trim the menorah block square; mine turned out to be 20: x 20"


To complete the table runner,  I then added a 20"x 20" section of novelty fabric on each side.   Two fat quarters could be substituted also
I backed it with leftover holiday fabric sections measuring 20" x 63", leaving a 6"-8" section open for turning.
Finish off by whip stitching the opening.

I will be quilting the table runner, so I left one short side open to allow for batting.

For more information about the Jewish Holiday of lights, and the traditional prayers said over the candles each night, click here.

Happy Hanukkah!


Friday, November 14, 2014

Oooh, Look! Sparkly!

It's that time of year again.

We're getting a little tired of Pumpkin Spiced anything,  and the poor Thanksgiving turkey is sobbing in the corner because he got squeezed out between Halloween and the looming Christmas festivities.

And those of us who celebrate Hanukkah, the Jewish Festival of Lights,  often wonder where "our" holiday decoration are.

So this year, I'm doing something different!


In searching for inspiration, I came across a lovely paper piecing pattern by Marsha Hohn at Quilter'sCache for this "menorah" block*. At first, I noticed how many little pieces there were!   But following the numbers in this pattern, it went quickly, and easily.....
and turned out looking wonderful!

After completing the block,  I did some stitch in the ditch around the menorah and candle.   To add some texture, I did some free-motion quilting to the background in a matching tread,
I decided it stood very well on its own, so I simply added a facing, instead of the more traditional binding.
It turned out  great, and will make a darling mini wall hanging to add some special sparkle to our house this Hanukkah!


*Permission generously provided by Marsha Hohn of  QuiltersCache.com


Tuesday, October 28, 2014

Wordless Wednesday: Bloggers Quilt Festival Edition


Vote for your favorite quilt here

Blogger's Quilt Festival ~ Fall 2014

I've quietly watched the Blogger's Quilt Festival for years while quietly sewing at home.   It's finally time to enter....


Yes.  I I've gathered up the confidence, so here goes.

In the Modern category, I'm entering this lovely wall quilt I completed after taking a class called "Make Mine Modern" with the lovely and talented Dawn Cavanaugh at MQX in Springfield just a few weeks ago.   

You see, for years, I thought I wasn't "following the rules" and was embarrassed that I never seemed to like to follow the directions. Once I found the Modern Quilt movement, and my guild, The Chicago Modern Quilt Guild (my tribe!!), I realized there were a lot of people who didn't always like to follow the rules.
Taking this class really allowed to me LET IT GO!  and do the kind of quilting I've always wanted to be, was kind of afraid to. 

getting ready to QUILT!

So when Dawn said "Make it Modern", well..... I DID!     And, I love how it turned out!

so here's a sneak peek of my favorite detail:
petaquilts: 2014

Since I really wanted to spend my time playing with the quilting, I didn't stray too far from the sample design provided for class. Thought I did take several groups of fabric, and stressed a little about which combo was best.    I love the way these colors work together.

This class also allowed to pull all the tricks and tools together to create the quilting I wanted.  Using both the blue (water) erasable pens, and the purple (air) erasable pens, I subdivided the negative space to provide many different sections to try out various free-motion designs.    SOme desings came from our class discussions, others from my own bag of tricks, and still others from the lectures I;d attended the previous day with Angela Walters.    Can you say FUN?!?

And so,,,,,here it is!   

Make it Modern ~ Peta's Way ~ 2014


Thanks for reading
 I hope you enjoyed hearing about my quilt!

To see more quilts in the Blogger's Quilt Festival click here