Hanukkah Table Runner
As part of the SewMamaSew.com "Handmade Holidays" series, I searched for fun, fresh handmade projects to celebrate the Jewish holiday of Hanukkah. It was a bit of a challenge.
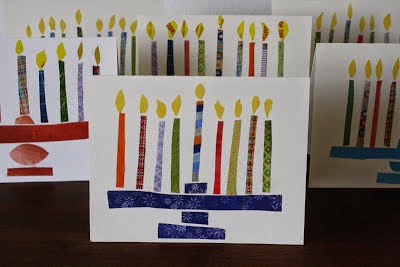
I did find this blog post, with wonderful handmade Hanukkah cards. I love the idea and the design so much, that I needed to make it into some kind of hand-sewn project for the upcoming Jewish holidays.
 |
| photo courtesy of BagelsandCrawfish.blogspot.com |
The kind folks over at BagelsandCrawfish gracious provided permission for me to use their cards as inspiration for my projects. Hop over here to read more about how they made these delightful cards.
What you'll need:
- 1 fat quarter for background
- assorted scraps for candles
- 5" square of orange for flames
- large scrap for menorah
- iron on fusible such as Steam-A-Seam Lite or similar
- 1 yard or 2 fat quarters for table runner
- backing 20" x 63"
- matching thread
To begin the project, I selected a white background from my fat quarter stash collection, and spend a few minutes poking through my scrap bin to find some bright, colorful pieces for the candles. It really evoked my memories of the brightly colored candles we used when I was young, and still use today.
The candle scraps were about 1-2: wide and about 6" long. For the menorah base, I sue a fat quarters I'd been saving for something special - this project definitely qualified.
Prepare your background by marking the center.
For the menorah base, cut a piece of fusible about 4-6" wide x 12" long
Fuse to the WRONG side of the fabric,
From the fused fabric, cut the pieces for your menorah base as desired.
Arrange your pieces, centered on the bottom 1/3 of your background.
Once you are satisfied with the placement, remove the paper backing and fuse the pieces to the background following the manufacturer's directions.
For the candles, iron fusible to the scraps you selected and cut them to about 1" x 6"
Cut one slightly large candle for the center "shamash" candle.
Finally, cut 9 teardrop shapes for the flames - this is much easier when the fabric is pre-fused (ask me how I know)
I wanted to really highlight the "handmade" look seen in the cards, so I paid special attention to making the candles not appear perfectly straight.
Once all of the candles and flames are firmly fused, you can do a number of creative things with your fabric menorah. I decided on a table runner.
Trim the menorah block square; mine turned out to be 20: x 20"
To complete the table runner, I then added a 20"x 20" section of novelty fabric on each side. Two fat quarters could be substituted also
I backed it with leftover holiday fabric sections measuring 20" x 63", leaving a 6"-8" section open for turning.
Finish off by whip stitching the opening.
I will be quilting the table runner, so I left one short side open to allow for batting.
For more information about the Jewish Holiday of lights, and the traditional prayers said over the candles each night, click here.
Happy Hanukkah!


I'm glad I found your blog. It's very, very nice. A new follower from Israel.
ReplyDeleteI'm about to start a Hanukkah table runner, looking for ideas and found your lovely photo and blog post. What a simple design. I had a similar idea, and might use Gwen Marston's "Chiclets" idea for the candle light. Iron on. What a wonderful last minute idea. Now, if I'll just get off the computer and start sewing! Happy Holidays.
ReplyDelete